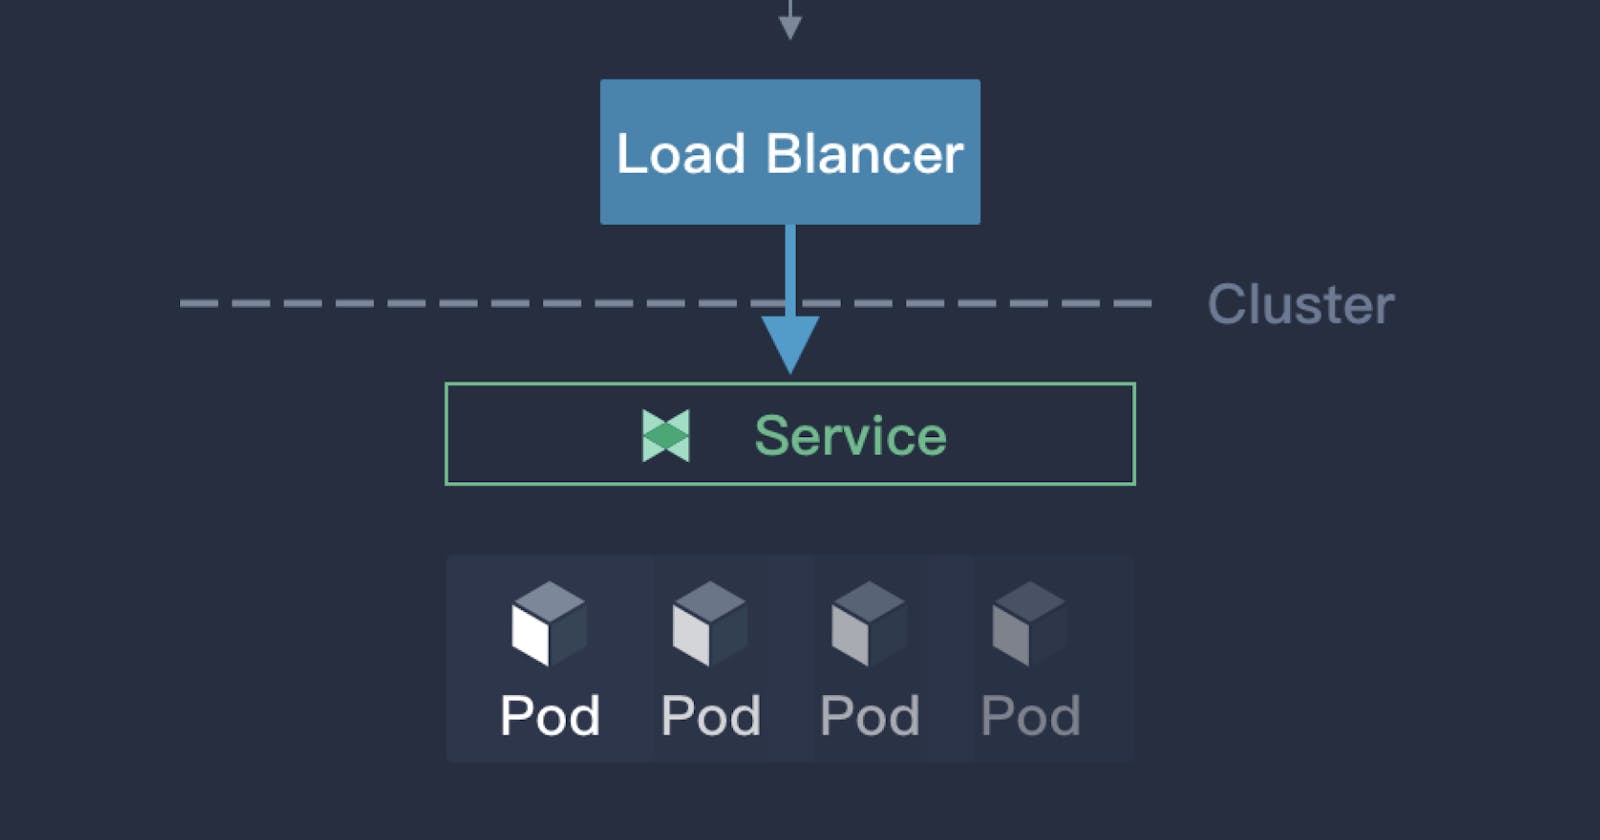


Service
In Kubernetes, a Service is a method for exposing a network application that is running as one or more Pods in your cluster.
A key aim of Services in Kubernetes is that you don't need to modify your existing application to use an unfamiliar service discovery mechanism. You can run code in Pods, whether this is a code designed for a cloud-native world, or an older app you've containerized. You use a Service to make that set of Pods available on the network so that clients can interact with it.
If you use a Deployment to run your app, that Deployment can create and destroy Pods dynamically. From one moment to the next, you don't know how many of those Pods are working and healthy; you might not even know what those healthy Pods are named. Kubernetes Pods are created and destroyed to match the desired state of your cluster. Pods are ephemeral resources (you should not expect that an individual Pod is reliable and durable).
Each Pod gets its own IP address (Kubernetes expects network plugins to ensure this). For a given Deployment in your cluster, the set of Pods running in one moment in time could be different from the set of Pods running that application a moment later.
This leads to a problem: if some set of Pods (call them "backends") provides functionality to other Pods (call them "frontends") inside your cluster, how do the frontends find out and keep track of which IP address to connect to, so that the frontend can use the backend part of the workload?
Enter Services.
Services in Kubernetes
The Service API, part of Kubernetes, is an abstraction to help you expose groups of Pods over a network. Each Service object defines a logical set of endpoints (usually these endpoints are Pods) along with a policy about how to make those pods accessible.
For example, consider a stateless image-processing backend which is running with 3 replicas. Those replicas are fungible—frontends do not care which backend they use. While the actual Pods that compose the backend set may change, the frontend clients should not need to be aware of that, nor should they need to keep track of the set of backends themselves.
The Service abstraction enables this decoupling.
The set of Pods targeted by a Service is usually determined by a selector that you define.
If your workload speaks HTTP, you might choose to use an Ingress to control how web traffic reaches that workload. Ingress is not a Service type, but it acts as the entry point for your cluster. An Ingress lets you consolidate your routing rules into a single resource, so that you can expose multiple components of your workload, running separately in your cluster, behind a single listener.
The Gateway API for Kubernetes provides extra capabilities beyond Ingress and Service. You can add Gateway to your cluster - it is a family of extension APIs, implemented using CustomResourceDefinitions - and then use these to configure access to network services that are running in your cluster.
Cloud-native service discovery
If you're able to use Kubernetes APIs for service discovery in your application, you can query the API server for matching EndpointSlices. Kubernetes updates the EndpointSlices for a Service whenever the set of Pods in a Service changes.
For non-native applications, Kubernetes offers ways to place a network port or load balancer in between your application and the backend Pods.
Either way, your workload can use these service discovery mechanisms to find the target it wants to connect to.
Defining a Service
A Service in Kubernetes is an object (the same way that a Pod or a ConfigMap is an object). You can create, view or modify Service definitions using the Kubernetes API. Usually you use a tool such as kubectl to make those API calls for you.
For example, suppose you have a set of Pods that each listen on TCP port 9376 and are labelled as app.kubernetes.io/name=MyApp. You can define a Service to publish that TCP listener:
apiVersion: v1
kind: Service
metadata:
  name: my-service
spec:
  selector:
    app.kubernetes.io/name: MyApp
  ports:
    - protocol: TCP
      port: 80
      targetPort: 9376
Applying this manifest creates a new Service named "my-service", which targets TCP port 9376 on any Pod with the app.kubernetes.io/name: MyApp label.
Kubernetes assigns this Service an IP address (the cluster IP), that is used by the virtual IP address mechanism. For more details on that mechanism, read Virtual IPs and Service Proxies.
The controller for that Service continuously scans for Pods that match its selector, and then makes any necessary updates to the set of EndpointSlices for the Service.
The name of a Service object must be a valid RFC 1035 label name.
Note: A Service can map any incoming port to a targetPort. By default and for convenience, the targetPort is set to the same value as the port field.
Port definitions
Port definitions in Pods have names, and you can reference these names in the targetPort attribute of a Service. For example, we can bind the targetPort of the Service to the Pod port in the following way:
apiVersion: v1
kind: Pod
metadata:
  name: nginx
  labels:
    app.kubernetes.io/name: proxy
spec:
  containers:
  - name: nginx
    image: nginx:stable
    ports:
      - containerPort: 80
        name: http-web-svc

---
apiVersion: v1
kind: Service
metadata:
  name: nginx-service
spec:
  selector:
    app.kubernetes.io/name: proxy
  ports:
  - name: name-of-service-port
    protocol: TCP
    port: 80
    targetPort: http-web-svc
This works even if there is a mixture of Pods in the Service using a single configured name, with the same network protocol available via different port numbers. This offers a lot of flexibility for deploying and evolving your Services. For example, you can change the port numbers that Pods expose in the next version of your backend software, without breaking clients.
The default protocol for Services is TCP; you can also use any other supported protocol.
Because many Services need to expose more than one port, Kubernetes supports multiple port definitions for a single Service. Each port definition can have the same protocol, or a different one.
Discovering services
Kubernetes supports 2 primary modes of finding a Service - environment variables and DNS.
Environment variables
When a Pod is run on a Node, the kubelet adds a set of environment variables for each active Service. It adds {SVCNAME}_SERVICE_HOST and {SVCNAME}_SERVICE_PORT variables, where the Service name is upper-cased and dashes are converted to underscores. It also supports variables (see makeLinkVariables) that are compatible with Docker Engine's "legacy container links" feature.
For example, the Service redis-primary which exposes TCP port 6379 and has been allocated cluster IP address 10.0.0.11, produces the following environment variables:
REDIS_PRIMARY_SERVICE_HOST=10.0.0.11
REDIS_PRIMARY_SERVICE_PORT=6379
REDIS_PRIMARY_PORT=tcp://10.0.0.11:6379
REDIS_PRIMARY_PORT_6379_TCP=tcp://10.0.0.11:6379
REDIS_PRIMARY_PORT_6379_TCP_PROTO=tcp
REDIS_PRIMARY_PORT_6379_TCP_PORT=6379
REDIS_PRIMARY_PORT_6379_TCP_ADDR=10.0.0.11
Note:
When you have a Pod that needs to access a Service, and you are using the environment variable method to publish the port and cluster IP to the client Pods, you must create the Service before the client Pods come into existence. Otherwise, those client Pods won't have their environment variables populated.
If you only use DNS to discover the cluster IP for a Service, you don't need to worry about this ordering issue.
DNS
You can (and almost always should) set up a DNS service for your Kubernetes cluster using an add-on.
A cluster-aware DNS server, such as CoreDNS, watches the Kubernetes API for new Services and creates a set of DNS records for each one. If DNS has been enabled throughout your cluster then all Pods should automatically be able to resolve Services by their DNS name.
For example, if you have a Service called my-service in a Kubernetes namespace my-ns, the control plane and the DNS Service acting together create a DNS record for my-service.my-ns. Pods in the my-ns namespace should be able to find the service by doing a name lookup for my-service (my-service.my-ns would also work).
Pods in other namespaces must qualify the name as my-service.my-ns. These names will resolve to the cluster IP assigned for the Service.
Kubernetes also supports DNS SRV (Service) records for named ports. If the my-service.my-ns Service has a port named http with the protocol set to TCP, you can do a DNS SRV query for _http._tcp.my-service.my-ns to discover the port number for http, as well as the IP address.
The Kubernetes DNS server is the only way to access ExternalName Services. You can find more information about ExternalName resolution in DNS for Services and Pods.
Headless Services
Sometimes you don't need load-balancing and a single Service IP. In this case, you can create what are termed "headless" Services, by explicitly specifying "None" for the cluster IP (.spec.clusterIP).
You can use a headless Service to interface with other service discovery mechanisms, without being tied to Kubernetes' implementation.
For headless Services, a cluster IP is not allocated, kube-proxy does not handle these Services, and there is no load balancing or proxying done by the platform for them. How DNS is automatically configured depends on whether the Service has selectors defined:
With selectors
For headless Services that define selectors, the Kubernetes control plane creates EndpointSlice objects in the Kubernetes API, and modifies the DNS configuration to return A or AAAA records (IPv4 or IPv6 addresses) that point directly to the Pods backing the Service.
Without selectors
For headless Services that do not define selectors, the control plane does not create EndpointSlice objects. However, the DNS system looks for and configures either:
DNS CNAME records for
type: ExternalNameServices.DNS A / AAAA records for all IP addresses of the Service's ready endpoints, for all Service types other than
ExternalName.For IPv4 endpoints, the DNS system creates A records.
For IPv6 endpoints, the DNS system creates AAAA records.
Publishing Services (ServiceTypes)
For some parts of your application (for example, frontends) you may want to expose a Service onto an external IP address, that's outside of your cluster.
Kubernetes ServiceTypes allow you to specify what kind of Service you want.
Type values and their behaviors are:
ClusterIP: Exposes the Service on a cluster-internal IP. Choosing this value makes the Service only reachable from within the cluster. This is the default that is used if you don't explicitly specify atypefor a Service. You can expose the service to the public with an Ingress or the Gateway API.NodePort: Exposes the Service on each Node's IP at a static port (theNodePort). To make the node port available, Kubernetes sets up a cluster IP address, the same as if you had requested a Service oftype: ClusterIP.LoadBalancer: Exposes the Service externally using a cloud provider's load balancer.ExternalName: Maps the Service to the contents of theexternalNamefield (e.g.foo.bar.example.com), by returning aCNAMErecord with its value. No proxying of any kind is set up.Note: You need eitherkube-dnsversion 1.7 or CoreDNS version 0.0.8 or higher to use theExternalNametype.
The type field was designed as nested functionality - each level adds to the previous. This is not strictly required on all cloud providers (for example: Google Compute Engine does not need to allocate a node port to make type: LoadBalancer work, but another cloud provider integration might do). Although strict nesting is not required, but the Kubernetes API design for Service requires it anyway.
You can also use Ingress to expose your Service. Ingress is not a Service type, but it acts as the entry point for your cluster. It lets you consolidate your routing rules into a single resource as it can expose multiple services under the same IP address.
Type NodePort
If you set the type field to NodePort, the Kubernetes control plane allocates a port from a range specified by --service-node-port-range flag (default: 30000-32767). Each node proxies that port (the same port number on every Node) into your Service. Your Service reports the allocated port in its .spec.ports[*].nodePort field.
Using a NodePort gives you the freedom to set up your own load balancing solution, to configure environments that are not fully supported by Kubernetes, or even to expose one or more nodes' IP addresses directly.
For a node port Service, Kubernetes additionally allocates a port (TCP, UDP or SCTP to match the protocol of the Service). Every node in the cluster configures itself to listen on that assigned port and to forward traffic to one of the ready endpoints associated with that Service. You'll be able to contact the type: NodePort Service, from outside the cluster, by connecting to any node using the appropriate protocol (for example: TCP), and the appropriate port (as assigned to that Service).
Choosing your own port
If you want a specific port number, you can specify a value in the nodePort field. The control plane will either allocate you that port or report that the API transaction failed. This means that you need to take care of possible port collisions yourself. You also have to use a valid port number, one that's inside the range configured for NodePort use.
Here is an example manifest for a Service of type: NodePort that specifies a NodePort value (30007, in this example).
apiVersion: v1
kind: Service
metadata:
  name: my-service
spec:
  type: NodePort
  selector:
    app.kubernetes.io/name: MyApp
  ports:
      # By default and for convenience, the `targetPort` is set to the same value as the `port` field.
    - port: 80
      targetPort: 80
      # Optional field
      # By default and for convenience, the Kubernetes control plane will allocate a port from a range (default: 30000-32767)
      nodePort: 30007
Reserve Nodeport Ranges to avoid collisions when port assigning
FEATURE STATE: Kubernetes v1.27 [alpha]
The policy for assigning ports to NodePort services applies to both the auto-assignment and the manual assignment scenarios. When a user wants to create a NodePort service that uses a specific port, the target port may conflict with another port that has already been assigned. In this case, you can enable the feature gate ServiceNodePortStaticSubrange, which allows you to use a different port allocation strategy for NodePort Services. The port range for NodePort services is divided into two bands. Dynamic port assignment uses the upper band by default, and it may use the lower band once the upper band has been exhausted. Users can then allocate from the lower band with a lower risk of port collision.
Custom IP address configuration for type: NodePort Services
You can set up nodes in your cluster to use a particular IP address for serving node port services. You might want to do this if each node is connected to multiple networks (for example: one network for application traffic, and another network for traffic between nodes and the control plane).
If you want to specify particular IP address(es) to proxy the port, you can set the --nodeport-addresses flag for kube-proxy or the equivalent nodePortAddresses field of the kube-proxy configuration file to particular IP block(s).
This flag takes a comma-delimited list of IP blocks (e.g. 10.0.0.0/8, 192.0.2.0/25) to specify IP address ranges that kube-proxy should consider as local to this node.
For example, if you start kube-proxy with the --nodeport-addresses=127.0.0.0/8 flag, kube-proxy only selects the loopback interface for NodePort Services. The default for --nodeport-addresses is an empty list. This means that kube-proxy should consider all available network interfaces for NodePort. (That's also compatible with earlier Kubernetes releases.)
Note: This Service is visible as <NodeIP>:spec.ports[*].nodePort and .spec.clusterIP:spec.ports[*].port. If the --nodeport-addresses flag for kube-proxy or the equivalent field in the kube-proxy configuration file is set, <NodeIP> would be a filtered node IP address (or possibly IP addresses).
Connecting Applications with Services
The Kubernetes model for connecting containers
Now that you have a continuously running, replicated application you can expose it on a network.
Kubernetes assumes that pods can communicate with other pods, regardless of which host they land on. Kubernetes gives every pod its own cluster-private IP address, so you do not need to explicitly create links between pods or map container ports to host ports. This means that containers within a Pod can all reach each other's ports on localhost, and all pods in a cluster can see each other without NAT. The rest of this document elaborates on how you can run reliable services on such a networking model.
This tutorial uses a simple nginx web server to demonstrate the concept.
Exposing pods to the cluster
We did this in a previous example, but let's do it once again and focus on the networking perspective. Create an nginx Pod, and note that it has a container port specification:
service/networking/run-my-nginx.yaml

apiVersion: apps/v1
kind: Deployment
metadata:
  name: my-nginx
spec:
  selector:
    matchLabels:
      run: my-nginx
  replicas: 2
  template:
    metadata:
      labels:
        run: my-nginx
    spec:
      containers:
      - name: my-nginx
        image: nginx
        ports:
        - containerPort: 80
This makes it accessible from any node in your cluster. Check the nodes the Pod is running on:
kubectl apply -f ./run-my-nginx.yaml
kubectl get pods -l run=my-nginx -o wide
NAME                        READY     STATUS    RESTARTS   AGE       IP            NODE
my-nginx-3800858182-jr4a2   1/1       Running   0          13s       10.244.3.4    kubernetes-minion-905m
my-nginx-3800858182-kna2y   1/1       Running   0          13s       10.244.2.5    kubernetes-minion-ljyd
Check your pods' IPs:
kubectl get pods -l run=my-nginx -o custom-columns=POD_IP:.status.podIPs
    POD_IP
    [map[ip:10.244.3.4]]
    [map[ip:10.244.2.5]]
You should be able to ssh into any node in your cluster and use a tool such as curl to make queries against both IPs. Note that the containers are not using port 80 on the node, nor are there any special NAT rules to route traffic to the pod. This means you can run multiple nginx pods on the same node all using the same containerPort, and access them from any other pod or node in your cluster using the assigned IP address for the Service. If you want to arrange for a specific port on the host Node to be forwarded to backing Pods, you can - but the networking model should mean that you do not need to do so.
You can read more about the Kubernetes Networking Model if you're curious.
Creating a Service
So we have pods running nginx in a flat, cluster wide, address space. In theory, you could talk to these pods directly, but what happens when a node dies? The pods die with it, and the Deployment will create new ones, with different IPs. This is the problem a Service solves.
A Kubernetes Service is an abstraction which defines a logical set of Pods running somewhere in your cluster, that all provide the same functionality. When created, each Service is assigned a unique IP address (also called clusterIP). This address is tied to the lifespan of the Service, and will not change while the Service is alive. Pods can be configured to talk to the Service, and know that communication to the Service will be automatically load-balanced out to some pod that is a member of the Service.
You can create a Service for your 2 nginx replicas with kubectl expose:
kubectl expose deployment/my-nginx
service/my-nginx exposed
This is equivalent to kubectl apply -f the following yaml:
service/networking/nginx-svc.yaml
apiVersion: v1
kind: Service
metadata:
  name: my-nginx
  labels:
    run: my-nginx
spec:
  ports:
  - port: 80
    protocol: TCP
  selector:
    run: my-nginx
This specification will create a Service which targets TCP port 80 on any Pod with the run: my-nginx label, and expose it on an abstracted Service port (targetPort: is the port the container accepts traffic on, port: is the abstracted Service port, which can be any port other pods use to access the Service). View Service API object to see the list of supported fields in service definition. Check your Service:
kubectl get svc my-nginx
NAME       TYPE        CLUSTER-IP     EXTERNAL-IP   PORT(S)   AGE
my-nginx   ClusterIP   10.0.162.149   <none>        80/TCP    21s
As mentioned previously, a Service is backed by a group of Pods. These Pods are exposed through EndpointSlices. The Service's selector will be evaluated continuously and the results will be POSTed to an EndpointSlice that is connected to the Service using a labels. When a Pod dies, it is automatically removed from the EndpointSlices that contain it as an endpoint. New Pods that match the Service's selector will automatically get added to an EndpointSlice for that Service. Check the endpoints, and note that the IPs are the same as the Pods created in the first step:
kubectl describe svc my-nginx
Name:                my-nginx
Namespace:           default
Labels:              run=my-nginx
Annotations:         <none>
Selector:            run=my-nginx
Type:                ClusterIP
IP Family Policy:    SingleStack
IP Families:         IPv4
IP:                  10.0.162.149
IPs:                 10.0.162.149
Port:                <unset> 80/TCP
TargetPort:          80/TCP
Endpoints:           10.244.2.5:80,10.244.3.4:80
Session Affinity:    None
Events:              <none>
kubectl get endpointslices -l kubernetes.io/service-name=my-nginx
NAME             ADDRESSTYPE   PORTS   ENDPOINTS               AGE
my-nginx-7vzhx   IPv4          80      10.244.2.5,10.244.3.4   21s
You should now be able to curl the nginx Service on <CLUSTER-IP>:<PORT> from any node in your cluster. Note that the Service IP is completely virtual, it never hits the wire. If you're curious about how this works you can read more about the service proxy.
Accessing the Service
Kubernetes supports 2 primary modes of finding a Service - environment variables and DNS. The former works out of the box while the latter requires the CoreDNS cluster addon.
Note: If the service environment variables are not desired (because possible clashing with expected program ones, too many variables to process, only using DNS, etc) you can disable this mode by setting the enableServiceLinks flag to false on the pod spec.
Environment Variables
When a Pod runs on a Node, the kubelet adds a set of environment variables for each active Service. This introduces an ordering problem. To see why, inspect the environment of your running nginx Pods (your Pod name will be different):
kubectl exec my-nginx-3800858182-jr4a2 -- printenv | grep SERVICE
KUBERNETES_SERVICE_HOST=10.0.0.1
KUBERNETES_SERVICE_PORT=443
KUBERNETES_SERVICE_PORT_HTTPS=443
Note there's no mention of your Service. This is because you created the replicas before the Service. Another disadvantage of doing this is that the scheduler might put both Pods on the same machine, which will take your entire Service down if it dies. We can do this the right way by killing the 2 Pods and waiting for the Deployment to recreate them. This time around the Service exists before the replicas. This will give you scheduler-level Service spreading of your Pods (provided all your nodes have equal capacity), as well as the right environment variables:
kubectl scale deployment my-nginx --replicas=0; kubectl scale deployment my-nginx --replicas=2;

kubectl get pods -l run=my-nginx -o wide
NAME                        READY     STATUS    RESTARTS   AGE     IP            NODE
my-nginx-3800858182-e9ihh   1/1       Running   0          5s      10.244.2.7    kubernetes-minion-ljyd
my-nginx-3800858182-j4rm4   1/1       Running   0          5s      10.244.3.8    kubernetes-minion-905m
You may notice that the pods have different names, since they are killed and recreated.
kubectl exec my-nginx-3800858182-e9ihh -- printenv | grep SERVICE
KUBERNETES_SERVICE_PORT=443
MY_NGINX_SERVICE_HOST=10.0.162.149
KUBERNETES_SERVICE_HOST=10.0.0.1
MY_NGINX_SERVICE_PORT=80
KUBERNETES_SERVICE_PORT_HTTPS=443
DNS
Kubernetes offers a DNS cluster addon Service that automatically assigns dns names to other Services. You can check if it's running on your cluster:
kubectl get services kube-dns --namespace=kube-system
NAME       TYPE        CLUSTER-IP   EXTERNAL-IP   PORT(S)         AGE
kube-dns   ClusterIP   10.0.0.10    <none>        53/UDP,53/TCP   8m
The rest of this section will assume you have a Service with a long lived IP (my-nginx), and a DNS server that has assigned a name to that IP. Here we use the CoreDNS cluster addon (application name kube-dns), so you can talk to the Service from any pod in your cluster using standard methods (e.g. gethostbyname()). If CoreDNS isn't running, you can enable it referring to the CoreDNS README or Installing CoreDNS. Let's run another curl application to test this:
kubectl run curl --image=radial/busyboxplus:curl -i --tty
Waiting for pod default/curl-131556218-9fnch to be running, status is Pending, pod ready: false
Hit enter for command prompt
Then, hit enter and run nslookup my-nginx:
[ root@curl-131556218-9fnch:/ ]$ nslookup my-nginx
Server:    10.0.0.10
Address 1: 10.0.0.10

Name:      my-nginx
Address 1: 10.0.162.149
Securing the Service
Till now we have only accessed the nginx server from within the cluster. Before exposing the Service to the internet, you want to make sure the communication channel is secure. For this, you will need:
Self signed certificates for https (unless you already have an identity certificate)
An nginx server configured to use the certificates
A secret that makes the certificates accessible to pods
You can acquire all these from the nginx https example. This requires having go and make tools installed. If you don't want to install those, then follow the manual steps later. In short:
make keys KEY=/tmp/nginx.key CERT=/tmp/nginx.crt
kubectl create secret tls nginxsecret --key /tmp/nginx.key --cert /tmp/nginx.crt
secret/nginxsecret created
kubectl get secrets
NAME                  TYPE                                  DATA      AGE
nginxsecret           kubernetes.io/tls                     2         1m
And also the configmap:
kubectl create configmap nginxconfigmap --from-file=default.conf
configmap/nginxconfigmap created
kubectl get configmaps
NAME             DATA   AGE
nginxconfigmap   1      114s
Following are the manual steps to follow in case you run into problems running make (on windows for example):
# Create a public private key pair
openssl req -x509 -nodes -days 365 -newkey rsa:2048 -keyout /d/tmp/nginx.key -out /d/tmp/nginx.crt -subj "/CN=my-nginx/O=my-nginx"
# Convert the keys to base64 encoding
cat /d/tmp/nginx.crt | base64
cat /d/tmp/nginx.key | base64
Use the output from the previous commands to create a yaml file as follows. The base64 encoded value should all be on a single line.
apiVersion: "v1"
kind: "Secret"
metadata:
  name: "nginxsecret"
  namespace: "default"
type: kubernetes.io/tls
data:
  tls.crt: "LS0tLS1CRUdJTiBDRVJUSUZJQ0FURS0tLS0tCk1JSURIekNDQWdlZ0F3SUJBZ0lKQUp5M3lQK0pzMlpJTUEwR0NTcUdTSWIzRFFFQkJRVUFNQ1l4RVRBUEJnTlYKQkFNVENHNW5hVzU0YzNaak1SRXdEd1lEVlFRS0V3aHVaMmx1ZUhOMll6QWVGdzB4TnpFd01qWXdOekEzTVRKYQpGdzB4T0RFd01qWXdOekEzTVRKYU1DWXhFVEFQQmdOVkJBTVRDRzVuYVc1NGMzWmpNUkV3RHdZRFZRUUtFd2h1CloybHVlSE4yWXpDQ0FTSXdEUVlKS29aSWh2Y05BUUVCQlFBRGdnRVBBRENDQVFvQ2dnRUJBSjFxSU1SOVdWM0IKMlZIQlRMRmtobDRONXljMEJxYUhIQktMSnJMcy8vdzZhU3hRS29GbHlJSU94NGUrMlN5ajBFcndCLzlYTnBwbQppeW1CL3JkRldkOXg5UWhBQUxCZkVaTmNiV3NsTVFVcnhBZW50VWt1dk1vLzgvMHRpbGhjc3paenJEYVJ4NEo5Ci82UVRtVVI3a0ZTWUpOWTVQZkR3cGc3dlVvaDZmZ1Voam92VG42eHNVR0M2QURVODBpNXFlZWhNeVI1N2lmU2YKNHZpaXdIY3hnL3lZR1JBRS9mRTRqakxCdmdONjc2SU90S01rZXV3R0ljNDFhd05tNnNTSzRqYUNGeGpYSnZaZQp2by9kTlEybHhHWCtKT2l3SEhXbXNhdGp4WTRaNVk3R1ZoK0QrWnYvcW1mMFgvbVY0Rmo1NzV3ajFMWVBocWtsCmdhSXZYRyt4U1FVQ0F3RUFBYU5RTUU0d0hRWURWUjBPQkJZRUZPNG9OWkI3YXc1OUlsYkROMzhIYkduYnhFVjcKTUI4R0ExVWRJd1FZTUJhQUZPNG9OWkI3YXc1OUlsYkROMzhIYkduYnhFVjdNQXdHQTFVZEV3UUZNQU1CQWY4dwpEUVlKS29aSWh2Y05BUUVGQlFBRGdnRUJBRVhTMW9FU0lFaXdyMDhWcVA0K2NwTHI3TW5FMTducDBvMm14alFvCjRGb0RvRjdRZnZqeE04Tzd2TjB0clcxb2pGSW0vWDE4ZnZaL3k4ZzVaWG40Vm8zc3hKVmRBcStNZC9jTStzUGEKNmJjTkNUekZqeFpUV0UrKzE5NS9zb2dmOUZ3VDVDK3U2Q3B5N0M3MTZvUXRUakViV05VdEt4cXI0Nk1OZWNCMApwRFhWZmdWQTRadkR4NFo3S2RiZDY5eXM3OVFHYmg5ZW1PZ05NZFlsSUswSGt0ejF5WU4vbVpmK3FqTkJqbWZjCkNnMnlwbGQ0Wi8rUUNQZjl3SkoybFIrY2FnT0R4elBWcGxNSEcybzgvTHFDdnh6elZPUDUxeXdLZEtxaUMwSVEKQ0I5T2wwWW5scE9UNEh1b2hSUzBPOStlMm9KdFZsNUIyczRpbDlhZ3RTVXFxUlU9Ci0tLS0tRU5EIENFUlRJRklDQVRFLS0tLS0K"
  tls.key: "LS0tLS1CRUdJTiBQUklWQVRFIEtFWS0tLS0tCk1JSUV2UUlCQURBTkJna3Foa2lHOXcwQkFRRUZBQVNDQktjd2dnU2pBZ0VBQW9JQkFRQ2RhaURFZlZsZHdkbFIKd1V5eFpJWmVEZWNuTkFhbWh4d1NpeWF5N1AvOE9ta3NVQ3FCWmNpQ0RzZUh2dGtzbzlCSzhBZi9WemFhWm9zcApnZjYzUlZuZmNmVUlRQUN3WHhHVFhHMXJKVEVGSzhRSHA3VkpMcnpLUC9QOUxZcFlYTE0yYzZ3MmtjZUNmZitrCkU1bEVlNUJVbUNUV09UM3c4S1lPNzFLSWVuNEZJWTZMMDUrc2JGQmd1Z0ExUE5JdWFubm9UTWtlZTRuMG4rTDQKb3NCM01ZUDhtQmtRQlAzeE9JNHl3YjREZXUraURyU2pKSHJzQmlIT05Xc0RadXJFaXVJMmdoY1kxeWIyWHI2UAozVFVOcGNSbC9pVG9zQngxcHJHclk4V09HZVdPeGxZZmcvbWIvNnBuOUYvNWxlQlkrZStjSTlTMkQ0YXBKWUdpCkwxeHZzVWtGQWdNQkFBRUNnZ0VBZFhCK0xkbk8ySElOTGo5bWRsb25IUGlHWWVzZ294RGQwci9hQ1Zkank4dlEKTjIwL3FQWkUxek1yall6Ry9kVGhTMmMwc0QxaTBXSjdwR1lGb0xtdXlWTjltY0FXUTM5SjM0VHZaU2FFSWZWNgo5TE1jUHhNTmFsNjRLMFRVbUFQZytGam9QSFlhUUxLOERLOUtnNXNrSE5pOWNzMlY5ckd6VWlVZWtBL0RBUlBTClI3L2ZjUFBacDRuRWVBZmI3WTk1R1llb1p5V21SU3VKdlNyblBESGtUdW1vVlVWdkxMRHRzaG9reUxiTWVtN3oKMmJzVmpwSW1GTHJqbGtmQXlpNHg0WjJrV3YyMFRrdWtsZU1jaVlMbjk4QWxiRi9DSmRLM3QraTRoMTVlR2ZQegpoTnh3bk9QdlVTaDR2Q0o3c2Q5TmtEUGJvS2JneVVHOXBYamZhRGR2UVFLQmdRRFFLM01nUkhkQ1pKNVFqZWFKClFGdXF4cHdnNzhZTjQyL1NwenlUYmtGcVFoQWtyczJxWGx1MDZBRzhrZzIzQkswaHkzaE9zSGgxcXRVK3NHZVAKOWRERHBsUWV0ODZsY2FlR3hoc0V0L1R6cEdtNGFKSm5oNzVVaTVGZk9QTDhPTm1FZ3MxMVRhUldhNzZxelRyMgphRlpjQ2pWV1g0YnRSTHVwSkgrMjZnY0FhUUtCZ1FEQmxVSUUzTnNVOFBBZEYvL25sQVB5VWs1T3lDdWc3dmVyClUycXlrdXFzYnBkSi9hODViT1JhM05IVmpVM25uRGpHVHBWaE9JeXg5TEFrc2RwZEFjVmxvcG9HODhXYk9lMTAKMUdqbnkySmdDK3JVWUZiRGtpUGx1K09IYnRnOXFYcGJMSHBzUVpsMGhucDBYSFNYVm9CMUliQndnMGEyOFVadApCbFBtWmc2d1BRS0JnRHVIUVV2SDZHYTNDVUsxNFdmOFhIcFFnMU16M2VvWTBPQm5iSDRvZUZKZmcraEppSXlnCm9RN3hqWldVR3BIc3AyblRtcHErQWlSNzdyRVhsdlhtOElVU2FsbkNiRGlKY01Pc29RdFBZNS9NczJMRm5LQTQKaENmL0pWb2FtZm1nZEN0ZGtFMXNINE9MR2lJVHdEbTRpb0dWZGIwMllnbzFyb2htNUpLMUI3MkpBb0dBUW01UQpHNDhXOTVhL0w1eSt5dCsyZ3YvUHM2VnBvMjZlTzRNQ3lJazJVem9ZWE9IYnNkODJkaC8xT2sybGdHZlI2K3VuCnc1YytZUXRSTHlhQmd3MUtpbGhFZDBKTWU3cGpUSVpnQWJ0LzVPbnlDak9OVXN2aDJjS2lrQ1Z2dTZsZlBjNkQKckliT2ZIaHhxV0RZK2Q1TGN1YSt2NzJ0RkxhenJsSlBsRzlOZHhrQ2dZRUF5elIzT3UyMDNRVVV6bUlCRkwzZAp4Wm5XZ0JLSEo3TnNxcGFWb2RjL0d5aGVycjFDZzE2MmJaSjJDV2RsZkI0VEdtUjZZdmxTZEFOOFRwUWhFbUtKCnFBLzVzdHdxNWd0WGVLOVJmMWxXK29xNThRNTBxMmk1NVdUTThoSDZhTjlaMTltZ0FGdE5VdGNqQUx2dFYxdEYKWSs4WFJkSHJaRnBIWll2NWkwVW1VbGc9Ci0tLS0tRU5EIFBSSVZBVEUgS0VZLS0tLS0K"
Now create the secrets using the file:
kubectl apply -f nginxsecrets.yaml
kubectl get secrets
NAME                  TYPE                                  DATA      AGE
nginxsecret           kubernetes.io/tls                     2         1m
Now modify your nginx replicas to start an https server using the certificate in the secret, and the Service, to expose both ports (80 and 443):
service/networking/nginx-secure-app.yaml
apiVersion: v1
kind: Service
metadata:
  name: my-nginx
  labels:
    run: my-nginx
spec:
  type: NodePort
  ports:
  - port: 8080
    targetPort: 80
    protocol: TCP
    name: http
  - port: 443
    protocol: TCP
    name: https
  selector:
    run: my-nginx
---
apiVersion: apps/v1
kind: Deployment
metadata:
  name: my-nginx
spec:
  selector:
    matchLabels:
      run: my-nginx
  replicas: 1
  template:
    metadata:
      labels:
        run: my-nginx
    spec:
      volumes:
      - name: secret-volume
        secret:
          secretName: nginxsecret
      - name: configmap-volume
        configMap:
          name: nginxconfigmap
      containers:
      - name: nginxhttps
        image: bprashanth/nginxhttps:1.0
        ports:
        - containerPort: 443
        - containerPort: 80
        volumeMounts:
        - mountPath: /etc/nginx/ssl
          name: secret-volume
        - mountPath: /etc/nginx/conf.d
          name: configmap-volume
Noteworthy points about the nginx-secure-app manifest:
It contains both Deployment and Service specification in the same file.
The nginx server serves HTTP traffic on port 80 and HTTPS traffic on 443, and nginx Service exposes both ports.
Each container has access to the keys through a volume mounted at
/etc/nginx/ssl. This is set up before the nginx server is started.
kubectl delete deployments,svc my-nginx; kubectl create -f ./nginx-secure-app.yaml
At this point you can reach the nginx server from any node.
kubectl get pods -l run=my-nginx -o custom-columns=POD_IP:.status.podIPs
    POD_IP
    [map[ip:10.244.3.5]]
node $ curl -k https://10.244.3.5
...
<h1>Welcome to nginx!</h1>
Note how we supplied the -k parameter to curl in the last step, this is because we don't know anything about the pods running nginx at certificate generation time, so we have to tell curl to ignore the CName mismatch. By creating a Service we linked the CName used in the certificate with the actual DNS name used by pods during Service lookup. Let's test this from a pod (the same secret is being reused for simplicity, the pod only needs nginx.crt to access the Service):
service/networking/curlpod.yaml
apiVersion: apps/v1
kind: Deployment
metadata:
  name: curl-deployment
spec:
  selector:
    matchLabels:
      app: curlpod
  replicas: 1
  template:
    metadata:
      labels:
        app: curlpod
    spec:
      volumes:
      - name: secret-volume
        secret:
          secretName: nginxsecret
      containers:
      - name: curlpod
        command:
        - sh
        - -c
        - while true; do sleep 1; done
        image: radial/busyboxplus:curl
        volumeMounts:
        - mountPath: /etc/nginx/ssl
          name: secret-volume
kubectl apply -f ./curlpod.yaml
kubectl get pods -l app=curlpod
NAME                               READY     STATUS    RESTARTS   AGE
curl-deployment-1515033274-1410r   1/1       Running   0          1m
kubectl exec curl-deployment-1515033274-1410r -- curl https://my-nginx --cacert /etc/nginx/ssl/tls.crt
...
<title>Welcome to nginx!</title>
...
Exposing the Service
For some parts of your applications you may want to expose a Service onto an external IP address. Kubernetes supports two ways of doing this: NodePorts and LoadBalancers. The Service created in the last section already used NodePort, so your nginx HTTPS replica is ready to serve traffic on the internet if your node has a public IP.
kubectl get svc my-nginx -o yaml | grep nodePort -C 5
  uid: 07191fb3-f61a-11e5-8ae5-42010af00002
spec:
  clusterIP: 10.0.162.149
  ports:
  - name: http
    nodePort: 31704
    port: 8080
    protocol: TCP
    targetPort: 80
  - name: https
    nodePort: 32453
    port: 443
    protocol: TCP
    targetPort: 443
  selector:
    run: my-nginx
kubectl get nodes -o yaml | grep ExternalIP -C 1
    - address: 104.197.41.11
      type: ExternalIP
    allocatable:
--
    - address: 23.251.152.56
      type: ExternalIP
    allocatable:
...

$ curl https://<EXTERNAL-IP>:<NODE-PORT> -k
...
<h1>Welcome to nginx!</h1>
Let's now recreate the Service to use a cloud load balancer. Change the Type of my-nginx Service from NodePort to LoadBalancer:
kubectl edit svc my-nginx
kubectl get svc my-nginx
NAME       TYPE           CLUSTER-IP     EXTERNAL-IP        PORT(S)               AGE
my-nginx   LoadBalancer   10.0.162.149     xx.xxx.xxx.xxx     8080:30163/TCP        21s
curl https://<EXTERNAL-IP> -k
...
<title>Welcome to nginx!</title>
The IP address in the EXTERNAL-IP column is the one that is available on the public internet. The CLUSTER-IP is only available inside your cluster/private cloud network.
Note that on AWS, type LoadBalancer creates an ELB, which uses a (long) hostname, not an IP. It's too long to fit in the standard kubectl get svc output, in fact, so you'll need to do kubectl describe service my-nginx to see it. You'll see something like this:
kubectl describe service my-nginx
...
LoadBalancer Ingress:   a320587ffd19711e5a37606cf4a74574-1142138393.us-east-1.elb.amazonaws.com
...
#KubeWeek challenge day4 Shubham Londhe