Kubernetes architecture and it's basic components :
Kubernetes Architecture Diagram:
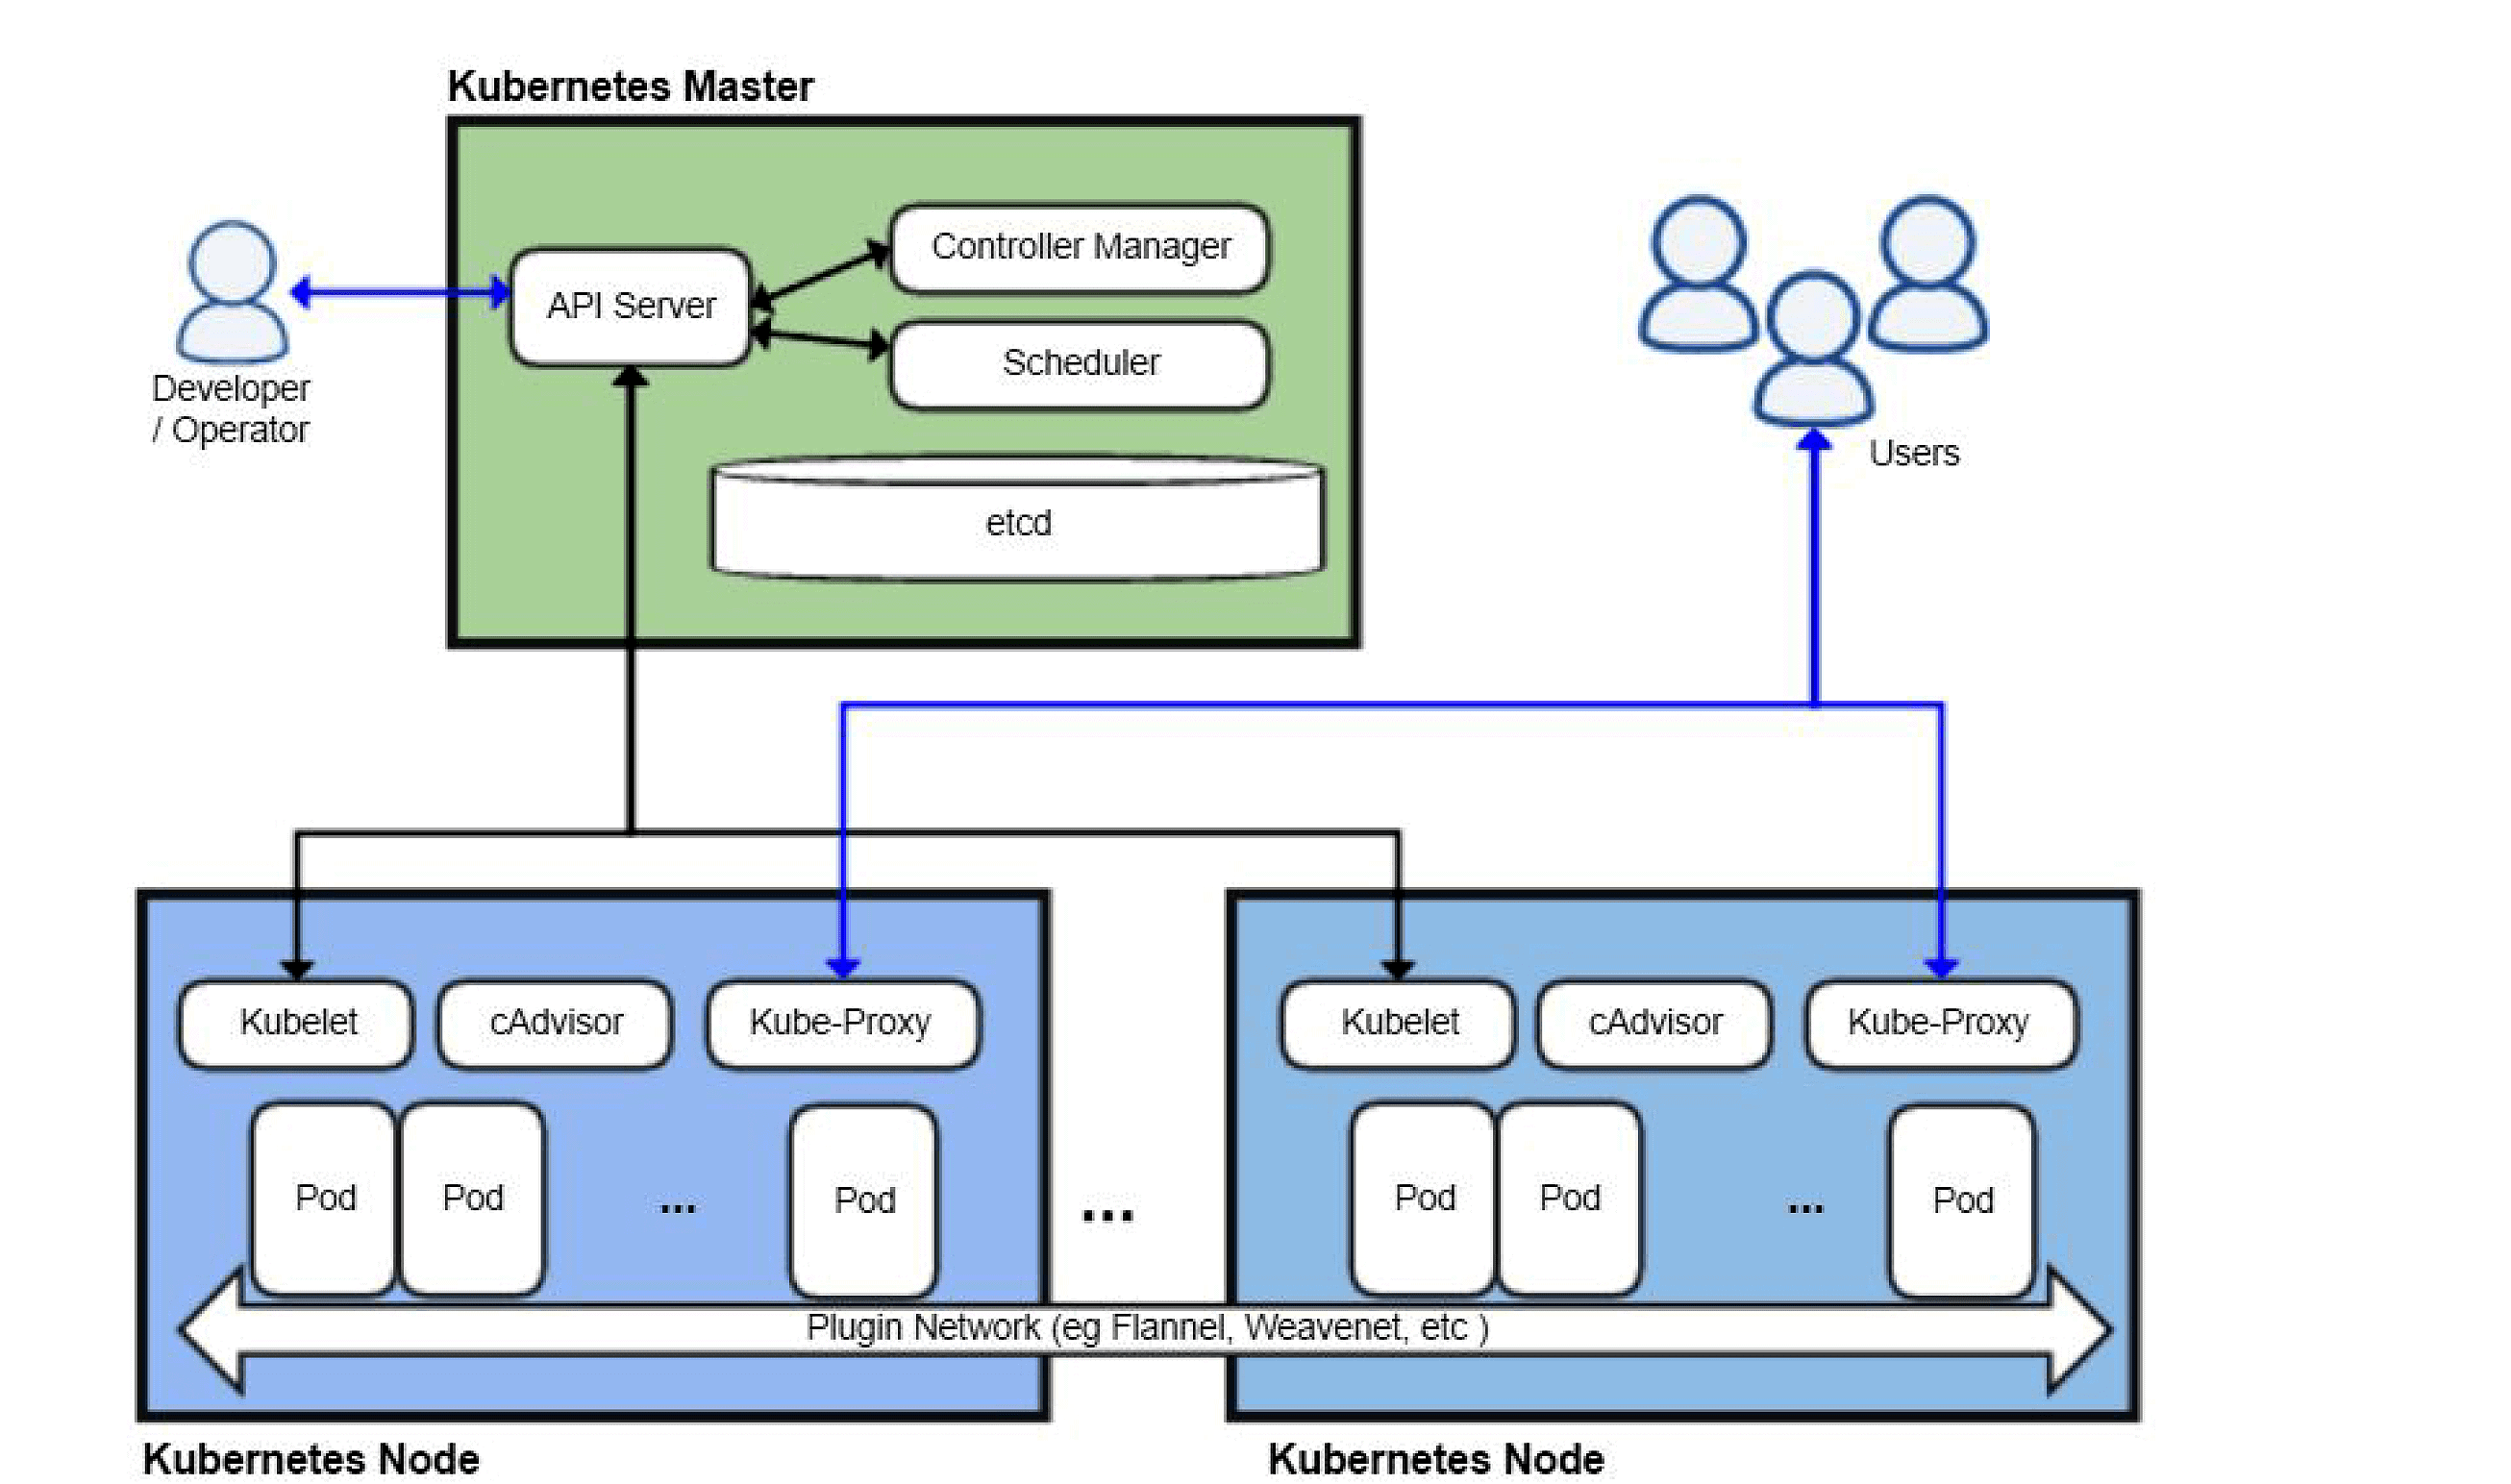
Kubernetes has just five basic components:
Three Master Components :
API Server
Controller manager
Scheduler
Two Node Components :
Kubelet
Proxy
The Master Node's
The Kubernetes logic is a collection of services:
The API server (our point of entry to everything!)
Core services like the scheduler and controller manager
etcd(a highly available key/value store; the "database" of Kubernetes)
Kubernetes logic is like the brain.
All these services together form what is called the "master".
These services can run in containers or straight on host machine(that's an implementation detail)
etcd service can be run on separate machines ( i.e. first schema) or co-located ( i.e. second schema)
At least one master is needed, but we can have more masters (for high availability)
The Worker Node's
The nodes executing our containers run another collection of services:
a container Engine (like Docker,rkt,kata etc)
kubelet(the "node agent")
kube-proxy (it's a necessary but not a sufficient network component for nodes)
Nodes were formerly called as "minions"
It is always recommended to not run applications on the node's that run master components (Except when you are using small development clusters)
What do kubernetes components do?
API Server
It provides a forward facing REST interface into the kubernetes control plane and datastore.
Interaction of kubernetes with all the clients and other applications is strictly through the API Server.
Four APIs are exposed through API server:
Kubernetes API
Extensions API
Autoscaling API
Batch API.
These components are used for communicating with the Kubernetes cluster and for executing container cluster operations.
The API Server is the only component that connects to etcd server.
Every other component to work with cluster state or access, must go through the API Server.
It handles authentication and authorization, admission control, mutation and request validation in addition it acts as front-end to the backing data store. It is like a gatekeeper to the cluster.
Scheduler
The responsibility of Scheduler is to monitor the resource utilization of each node and scheduling the containers according to resource availability.
Default scheduler uses bin packing.
Requirements can include: general hardware requirements, labels, affinity/anti-affinity, and various other custom resource requirements.
Controller Manager
Serves as the primary daemon which manages all the core component control loops.
Through the API server, it monitors the current state of the applications that are deployed on Kubernetes and it makes sure that desired state is met.
etcd
Its a distributed, consistent key-value store and released as an open source by CoreOS.
Its used for:
Configuration management,
service discovery
coordinating distributed work
Kubernetes uses etcd as the persistence storage of all of its API objects (what nodes exist in the cluster, what pods should be running, which nodes they are running on, etc).
Etcd implements a watch feature, it provides an event-based interface for monitoring changes to keys asynchronously. Through these systems clients are allowed to perform a lightweight subscription for the changes to parts of the key namespace. Once a key is changed, “watchers” get notified immediately. In the context of Kubernetes, this is a crucial feature as the API Server component relies heavily on this to get notified and calls the appropriate business logic components in order to move the current state towards the desired state.
Kubelet
It Acts as the node agent and manages the lifecycle of every pod on its host.
It uses of the pod specification in order to create containers and manage them.
Kubelet understands YAML container manifests which it can read from several sources:
File path
HTTP Endpoint
etcd watch acting on any changes
HTTP Server mode accepting container manifests over a simple API.
Kube-proxy
It runs in each node and manages the network rules on each node.
Performs load balancing or connection forwarding for Kubernetes cluster services.
It uses proxy modes rules for doing simple load balancing, TCP, UDP stream forwarding and round robin TCP, UDP forwarding.
Available Proxy Modes:
Userspace
Iptables
IP Virtual Server (ipvs) - default if supported
What is Etcd?
Etcd is an open-source distributed key-value store.
For many of the distributed systems it serves as the backbone. It is used to store and manage the critical information that is needed to keep distributed systems running. Prominently it manages the configuration data, metadata and state data.
Containerized environments have complex data management requirements, as we scaleup the complexity increases further more. Kubernetes makes the process simple by coordinating tasks such as configuration, load balancing, health monitoring, deployment, service discovery and job scheduling across cluster. In order to achieve this coordination, there is a need of data store that provides the true status of the system, clusters, pods and all the application instances that are within them at any given point of time. Etcd is the data store that fulfills this requirement.
In case of Kubernetes cluster, an etcd instance can be deployed as Pod on the masters, or in order to add an additional level of security and flexibility it can be deployed in external cluster.
Kubernetes Etcd’s watch functionality to monitor changes to the actual or the desired state of its cluster. Whenever they are different, Kubernetes makes changes to align the two states. Everytime read by the kubectl command the data is retrieved from the data that is stored in Etcd, any change made by kubectl command will add or update entries in Etcd data store.
Etcd properties:
Fully Replicated: The entire data store is available on every node in a cluster.
Highly Available: Etcd is designed to avoid single points of failure and, tolerate hardware failures and network issues.
Consistent and Reliable: Every data read returns the most recent write across cluster. Using the Raft algorithm the store is properly distributed.
Simple: Using standard HTTP/JSON tools, any application, from simple web apps to complex container orchestration engines can read and write data to etcd.
Secure: Implements automatic TLS with optional client certificate authentication.
Fast: Etcd is benchmarked at 10,000 writes per second.
Why we need kubernetes scheduler?
In current scenario wherein at a particular instance of time there are requests for n number of instances of application and multiple servers are being used to spawn them, it becomes necessary to place right instance in right server by checking various parameters like resource requirements, hardware and software constraints,policy constraints, data locality and much more.
On top of this there is also a need to balance the load.
Manually doing this will be a huge task, which is tedious and we are bound to miss on various parameters.
Then what is the solution for this?
The solution to this is Kubernetes scheduler.
What is Kubernetes scheduler?
Kubernetes scheduler is a part of Kubernetes container orchestration platform. Scheduler makes sure that Pods are mapped to the Nodes.
Scheduler basically controls Performance, capacity and availability in kubernetes cluster.
In Kubernetes cluster containers are placed inside pods and pods are placed inside Nodes. API sets requirements that are specific to a workload. Scheduler attempts to place each Pod created by Kubernetes on one of the nodes based on resource availability.
For high availability instances pods can be deployed across nodes.
Kube-scheduler
The default scheduler for Kubernetes is kube-scheduler. Design of kube-scheduler is such that we can write our own scheduling component and use it.
For all the newly created and unscheduled pods, kube-scheduler finds an optimal node for these pods to run on. Container in pods will have different requirements for resources and even the pods also will have different requirements. Therefore, based on specific scheduling requirements the nodes will be selected.
Scheduling decisions are based on various factors like individual and collective resource requirements, affinity and anti-affinity specifications, hardware and software constraints,policy constraints, data locality and much more.
How does node selection happen?
Node selection is a 2-step operation:
Filtering
Scoring
Filtering step will find all the nodes where its feasible to schedule a specific pod, once this step is done a list is ready with suitable nodes. After this step if list is empty, then that particular pod is not schedulable until required resource is available.
Scoring is the step, where the nodes from list in previous step get scores based on which one is most suitable for pod placement.
kube-scheduler will assign the Pod to the Node that has the highest score. If more than one node have equal scores, kube-scheduler selects one node from the list randomly.
Cluster:
Cluster is a loosely or tightly connected set of computers that work together. They work as a single system. Clusters use nodes to perform the tasks. They are usually managed by masters.
Installation of Kubernetes Cluster:
Inorder to leverage the orchestration features of Kubernetes to manage applications, we are going to create a 3-node Kubernetes cluster with 1 Master Node and 2 Worker Nodes. Let us see the steps to be followed in general.
Install container platform (Ex: docker) on all nodes
Install Kubernetes binaries on all nodes
Initialize and start kubelet service on all nodes
Perform kubeadm init command on master node to initialize cluster
Install network solution (Ex: flannel, weave, calico etc.) on master node
Join worker nodes to the cluster using kubeadm join command
Now the cluster is set up and ready to accept work load.
Shubham Londhe #kubeWeek Challenge


